It's simple and free to set up a Blog (or website) on Blogger, and one can post to Blogger through either the website or mobile device applications.
To get started, simply head to blogger.com
It appears that you simply need a Google Account, and with one you automatically can use Blogger to set up one or more blogs. Because of the Google-Plusification-Of-Everything it will also be useful if your Google Account is associated with a Google+ profile. That's because Blogger is now set up to preferentially treat a Google+ profile, and for example can autopost from the blog to Google+ and use Google+ as the commenting system.
There's a growing set of people who are wary of Google, and I can't say I blame them, and feel reluctant to set up a Google+ profile, but such people probably shouldn't be using Blogger anyway.
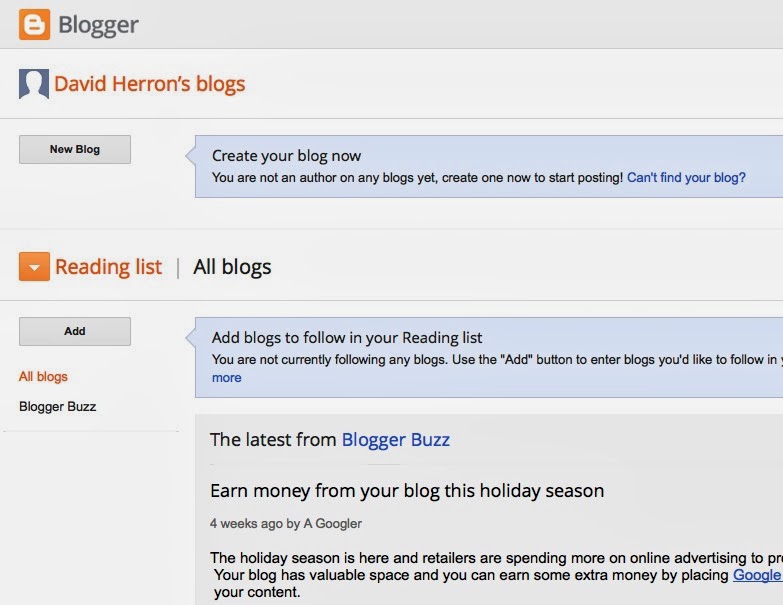
Once you're logged in you'll be brought to a page that looks like what's shown on the right. Simply click the button marked New Blog to start creating a new blog, of course.
 This page lists all your blogs, and you can also set up a "reading list" of blogs to subscribe to. I really don't use this feature, but I suppose they mean it to add a bit of social network feel between the users of Blogger. It is one way to keep track of the Blogger Buzz blog (Google's official blog about Blogger) because you're autosubscribed to it.
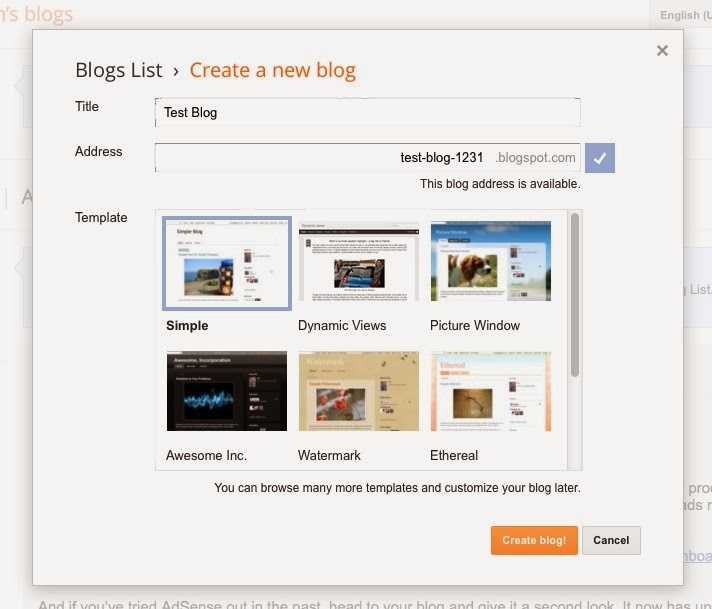
Clicking on New Blog gives you a dialog box like what's shown here.
There are three choices to make: 1) the name of the blog, 2) the blog URL, and 3) the theme to be used.
The "name" appears in the header area, and inside the HTML, and is the public name for the blog. The "URL" is the computerized name of the blog, and is what shows up in the location bar in your browser.
Themes control how the blog looks - the colors and font choices, and even on-screen behavior. Google provides a few competent themes, and there is a cottage industry of people providing Blogger themes. For now you can choose one of the built-in themes.
Now you're brought to the dashboard for your blog:

One that you'll want to visit eventually is the Blogger Guide in the lower right corner. For now, keep reading on and I'll show you the ropes.
On the left is a navigation bar for different sub-areas of Blogger administration.
- "Posts" and "Pages" let you manage the two kinds of content pages Blogger supports.
- The "Comments" section lets you manage the comments left on the blog, while the Google+ section lets you connect the blog to a Google+ page or even use Google+ for comment support.
- The "Stats" section is an attempt to show traffic statistics, but on my blogs the numbers Google shows seem to be innacurate, and I trust Google Analytics instead.
- The "Earnings" section lets you connect the blog to Adsense, and easily set up Adsense advertising on the blog.
- The "Layout" section gives you some modest control over the page layout, primarily letting you set up sidebar widgets.
- The "Template" section gives you modest control over how the blog looks, or to upload a custom blog template.
- The "Settings" section lets you set up all kinds of details about the blog.
Writing a blog post
Too many words, let's just get started writing, that's what we're here for, yes?Click on "New Post" and you're brought here:

This is a fairly straightforward WYSIWYG(sorta) editor in which you write blog posts. Enter a title up at the top, and enter text at the bottom. You can make things bold, or italic, etc. Click on the HTML button and you can edit the raw HTML (which will be important at times).
Hover your mouse over the toolbar buttons and they tell you their function. Most are straightforward.
The image button brings up this dialog:

Once an image is in your blog post, you can click on it and some choices appear such as the image size, whether to add a caption, and the alignment of the image on the page.
A very important button on the right end of the toolbar is marked "Tx" and the tooltip says "Remove Formatting". If you copy and paste text from elsewhere, it will often carry with it formatting information, and Blogger will attempt to recreate that formatting using HTML tags. But it often gets this wrong and the results look horrible. The "Remove Formatting" button will remove the majority of those excess HTML tags, leaving you (in most cases) with clean text.
In case Remove Formatting doesn't do enough, you can click on the HTML button and grunt around in the code to remove anything that's not needed. Of course, you'll have to know enough HTML to do it.
Over at the right are some useful options, the most important of which is Labels. The Labels let you add categorization to blog posts, and Blogger autogenerates pages for each category Label showing all the posts with that label. Very useful.
You can also auto-schedule posts by manipulating the date the post appears to have been posted. Set a date in the future, and Blogger will wait until that time to make the posting visible. You can also set a time in the past, in case that's useful.
List of Postings
Now that you've written a blog post you're brought here:
There is a similar listing if you click on Pages. A Page is different from a Blog Post by being a Page. The practical difference is that Blog Posts are ordered by chronological order, while Pages simply exist.
Changing the Layout
Blogger has a fairly flexible layout system:
Adding a widget is fairly simple - just click on Add a Gadget


And then the widget is in the layout

Template Designer
The Template designer area is where you can select among the templates Google provides, or upload one of your choosing. You can also click on the Customize button and configure colors and image choices.The Designer gives you a lot of flexibility, within limits.
An interesting area is the Layout section that lets you adjust how many sidebars and how many footer areas are available.
Once you're ready click on the Apply To Blog button.
Settings
The settings area is a lot of knobs and buttons you can twist and turn to set things up.
The Basic settings page lets you change these things.
Adding a custom domain lets the URL be something like http://www.longtailpipe.com rather than longtailpipe.blogspot.com. This is very important for branding, especially if later you want to switch to a different website platform than Blogger.
Blogger allows multiple authors per blog. Blogs can also be private if you prefer.

On this blog we set "Show at Most" so that the front page has only the front page posting.

The Blog Tools page has some important features in it.
First, you can export your blog, delete your blog, or import the blog into another blog. The content you post to your blog is your content, so of course Blogger lets you export it. Any respectable service lets you do that, right? The export format is a gronky XML thing that Google cooked up, but at least it's something you can do something with.
One thing you can do is import that file into another Blogger blog. Or, other blogging engines like Wordpress or Drupal can import Blogger export files.
The blog feed choice controls the content of the RSS/Atom feed produced by the blog. Some people think the feed should have Full content, while I prefer to publish only teasers through the feed.
The Post Feed Redirect URL is important if you're passing the feed through feedburner.
Enclosure links are important if you're publishing a podcast. Yes, podcasts can be published by Blogger blogs, though the media files have to be published somewhere else.
The Analytics Web Property ID is where you connect the blog with Analytics. As I said earlier, the Blogger Stats are innacurate. Go over to google.com/analytics and set up an Analytics account, then plug the ID in here.
There are a lot more settings, these are the high points.
No comments:
Post a Comment